
 In this tutorial, we will go over the simple steps to install an IPSec/L2TP VPN server on google compute engine.
Why?
There are many cases that we need to use a secure channel between a local machine (it might be the firewall of our office or just your development laptop) and our cloud infrastructure. The answer (in most cases) is to have a VPN server in our cloud that will be the entry point. Here we are going to look at a client-server solution. If you are looking at a solution that will give you server to server configuration please go to this post: greenido.wordpress.com/2014/04/10/how-to-set-a-vpn-on-google-compute-engine/
First, I’m going to assume you have an account with Google cloud and you already know how to launch an instance on Google Compute Engine. If not, this post could help you do it in less then 5 min.
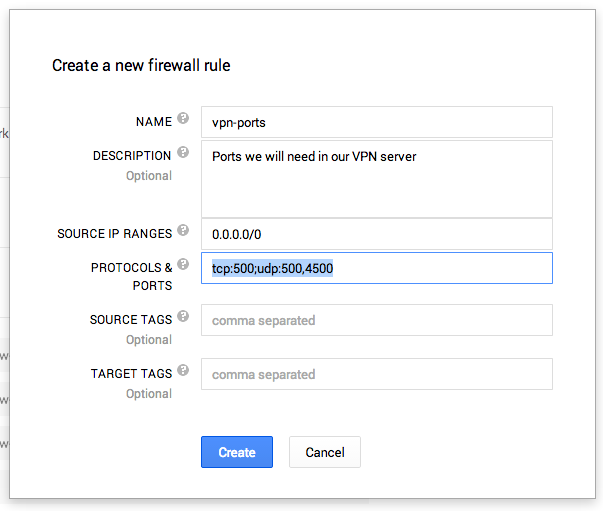
First steps after we launch a new instance is to set its networking rules. Btw, when you click on ‘New Instance’ make sure to choose: debian-7-wheezy.
- Allow traffic to TCP port 500, and UDP ports 500 and 4500.
- Add a rule to allow SSH (22 or change it in order to make it a bit more secure).
Install the VPN (openswan) on Google Compute Engine
- gcutil to your instance and copy this script into: vpn-installtion.sh
- Change the default value for 5 variables:
1. Public IP, private IP – You get this information from cloud console (see the image below).
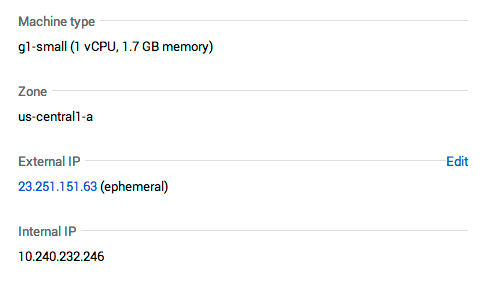
2.IPSEC_PSK,VPN_USERandVPN_PASSWORD - Give your own values here. - sudo ./vpn-installtion.sh
- As of today (8/8/2014) it seems that the latest security update of debian wheezy for openswan is blocking VPN connections with l2tp.
So in order to by pass it type:
apt-get install openswan=1:2.6.37-3
and you will get a working version of openswan.

Checkout the logs on the server
tail -f /var/log/auth.log
tail -f /var/log/syslog
In case we have any issues you will be able to see them in the log files.
Configure the VPN on your Chromebook
On chromebook it’s very quick and easy to configure our VPN settings. All you need to do is to go to the bottom-right side and click on the network icon. On the pop-up dialog you will have an item: “VPN” – Click on it and later “Join Others”.
You will get this dialog:
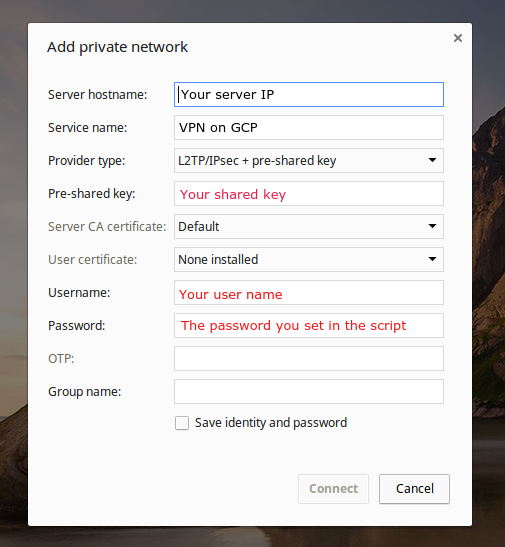
- Fill the fields that are in red with the same values you type into the vpn-startup script.
- Fill the fields that are in black with information that will help you remember what is this service.
- A cool way to check what is going on with the network after you are connected is to open a new tab with: chrome://network
It will show you a lot of data about your network connection.
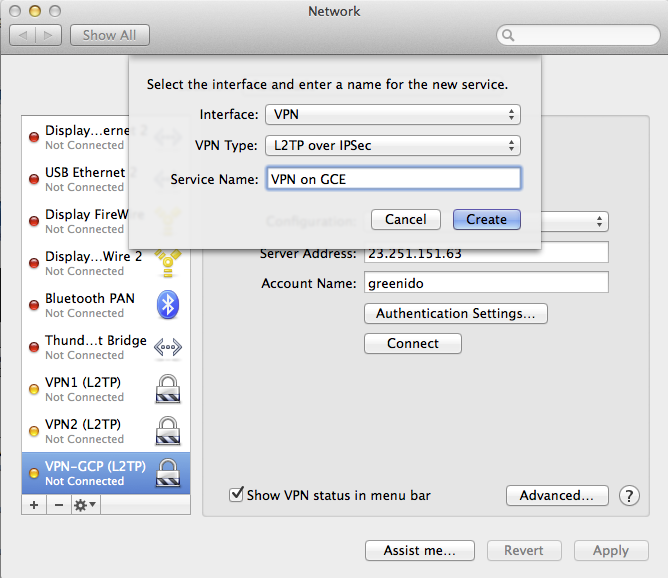
Configure the VPN on your Mac
- Open your network settings and click on the “+” button in the top-left corner of the interfaces list
- Select a VPN interface, with ‘IPSec L2TP’ and give it a name. For example: VPN-GCE-1
- In the address field, put the public IP of your server. You can see it as ‘external IP’ in your cloud console.
- In the account name field, put the value of the VPN_USER variable that you defined earlier.
- Click on auth settings, fill your VPN_PASSWORD in the first field and your IPSEC_PSK in the second box. Click Ok
- Click on Advanced Settings, select “Send all traffic” and click ok.
- Click Connect, it should take a few seconds and you should be online. Unless, something is broken and then you will get a dialog that asking you to call
In order to confirm that you are connected and everything is working well, go to: google and write ’what is my ip address’, you should see the public/external IP address.
Misc
Happy and secure hacking.
Discover more from Ido Green
Subscribe to get the latest posts sent to your email.

having a problem with appengine sql deny one Ip and allow another.. ( provide access to both IPs in the app engine console ) .
Hi, thank you for detailed instructions. I followed these instructions and manage to make it work on my mac. However, I am having some issues connecting to VPN from Windows 10 machine. Can you provide me some steps to conenct from windows 10 as well ?
You ought to be a part of a contest for one of the finest sites online.
I will highly recommend this web site!
Thank you!
I so appreciate this article that got me thinking about the possibilities though my purpose is different. I want a VPN connection with my vm instance (win server 2012) and my pc is win7. Hope you can shed some light on this on how to achieve it.
Worked like a charm! Thanks for the great article.
This is really interesting, You’re an overly professional blogger.
I’ve joined your feed and stay up for searching for extra of your fantastic post.
Also, I have shared your website in my social networks
Thank you!
Hi, I desire to subscribe for this webpage to take latest updates, thus
where can i do it please help out.
You can subscribe with this link: http://feedburner.google.com/fb/a/mailverify?uri=wordpress/iFnB&loc=en_US
Btw, It on the main page if you click on the ‘hamburger’ menu.
Asking questions are genuinely pleasant thing if you are not understanding something totally, but this article gives pleasant understanding yet.
Could you possibly make a video about how to do this?
Or could you explain in a lot of detail how to put the script on, and how to execute it?
Sorry, this is my first time trying to do this, and I need a bit of a push!
Just desire to say your article is as amazing.
The clearness in your post is just excellent and i can assume you’re an expert on this subject.
Fine with your permission let me to grab your feed to keep updated with forthcoming post.
Thanks a million and please carry on the enjoyable work.
This doesn’t seem to work on Debian 8 😦 is there an update on what is needed to make it work on that version?
It’s actually a great and useful piece of information.
I’m satisfied that you just shared this helpful info with us.
Please keep us up to date like this. Thank you for sharing.
Debian 8: replace ‘openswan’ with ‘strongswan’ in the script
Thanks a lot for this post IDO.
Thanks to VLAD for pointing out the difference for Deb 8. With that one change, it worked like a charm.